In this article, I explore how to add templates for WooCommerce in full site editing themes.
I wanted to learn if it is possible to customize shop pages and checkout and if we can edit our products visually with drag and drop, adding our brand colors by only using block settings.
I learned that we are almost there; creating a fully working shop is possible, but you can’t customize every detail in the WordPress block editor.
The prerequisites for this article is basic knowledge of the block theme templating system, the Site Editor, and WooCommerce. If you are new to block themes and you have arrived at this page directly, I recommend starting the course from the beginning.
Estimated reading time: 1 minute
Last updated
Is WooCommerce compatible with full site editing?
WooCommerce has partial support for full site editing. Using WooCommerce with a block theme require no additional setup besides the usual steps for setting up your shop. It will work out of the box with any up-to-date block theme.
Caveats
Not all WooCommerce template functions and actions have a block or block setting equivalent, meaning that customizing block templates can feel limited compared to classic templates. Secondly, not all third-party extensions for WooCommerce supports block themes.
One big drawback, as you may already know, is that WooCommerce uses the classic editor for creating and editing products in the WooCommerce admin interface.
Four ways to use WooCommerce features in block themes
There are essentially four ways to use for WooCommerce in block themes:
- The WooCommerce Classic Template blocks, which uses a placeholder in the editor and can not be edited. Woo recommends only using the Classic Template blocks if you use extensions that are not compatible with the newer product blocks.
- WooCommerce product blocks
- WooCommerce Shortcodes
- Free and paid third-party block plugins
In this lesson, I will compare the first two options, but I will not go into using the shortcodes. Woo recommends using the blocks instead of the shortcodes.
WooCommerce default shop templates
When you activate WooCommerce the plugin automatically adds the necessary shop templates. You only need to add WooCommerce template files to your theme if you want to customize them. If WordPress can not find any custom theme templates, it loads the default templates from the plugin.
The following templates are added by WooCommerce. Users can edit the templates in the Site Editor, but to a varying degree. Som blocks have styling options, others can only be moved.
| Template | Editable blocks | Classic template placeholder |
|---|---|---|
| Product Catalog (shop page) | Yes | Optional with the Classic Product Template |
| Product Search Results | Yes | Optional with the Classic Product Template |
| Products by Category | Yes | Optional with the Classic Product Template |
| Products by Attribute | Yes | Optional with the Classic Product Template |
| Products by Tag | Yes | Optional with the Classic Product Template |
| Single Product | Yes | Optional with the Classic Product Template |
| Checkout | Yes | No, but can be switched to the shortcode |
| Cart | Yes | No, but can be switched to the shortcode |
| Order Confirmation | Yes | No |
How to add customized WooCommerce templates to your block theme
Compared to classic, PHP based themes, you do not need to create a custom woocommerce folder to override the plugin templates. Instead, you place all your HTML templates in your theme’s templates folder.
These are the template file names that are known so far (in WooCommerce 8.6.1) that you can use to override the plugin templates:
| Template | Block theme file |
|---|---|
| Product Search Results | product-search-results.html |
| Products by Category | taxonomy-product_cat.html or archive-product.html |
| Products by Attribute | taxonomy-product_attribute.html or archive-product.html |
| Product Catalog (shop page) | archive-product.html |
| Products by Tag | taxonomy-product_tag.html or archive-product.html |
| Single Product | single-product.html |
| Checkout | checkout.html |
| Cart | cart.html |
| Order Confirmation | order-confirmation.html |
Note that using the file names page-checkout.html and page-cart.html will no longer replace the default templates.
If you want to use PHP you need to remove the WooCommerce block templates.
Besides the templates, you may also want to edit the Mini cart template part. The file name is mini-cart.html and you place it in the parts folder.
How to add WooCommerce blocks to your custom templates
First, activate your theme and WooCommerce. You will want to import some example products in order to test your templates. WooCommerce makes this step easy because it is part of their new setup wizard.
Instead of starting from a blank template, I strongly recommend that you open the Site Editor, select the plugin template, and make your changes there. When you first start out, this will be faster than trying to figure out which WooCommerce blocks that are suitable for which template, because there are many blocks to choose from.
When you have made your changes, you need to copy them from the plugin template to your theme template. As a refresher, here are two ways to copy blocks to your HTML files:
- Copy the blocks, create a new HTML file with the matching file name (as listed above) inside your theme’s templates folder, and manually paste the code into your HTML file using your code editor.
- Use the Export feature in the Options menu in the Site Editor. The Options menu is the three dot menu which is at the top right corner of the Site Editor, next to the save button. This will export the entire theme, not only the changes you made. It will give you a new zip file that you will need to extract or upload to the themes folder on your WordPress installation.
Remember that if you have saved your changes in the Site Editor, they are stored in the database you need to reset your customizations to see changes to your HTML files.
Of course, you are not limited to using the templates that make up the base of your shop. You can add the WooCommerce blocks to any template, part, or pattern.
Using the WooCommerce Classic Template blocks
Only use the Classic Template blocks if you are experiencing errors with the new blocks or if you need to support a third party plugin or service that does not work with blocks.
The Classic Product Template and the Classic Template Placehoder displays a placeholder in the editor and is fully functional on the front of the website.
There is no way to preview or customize the classic template using the Site Editor. The entire template is a single block:

Templates that support the Classic Template blocks have an option that you can use to revert the entire template. To find this option, you need to select the Template tab in the Site Editor:

The markup of the Classic Templates will look similar to these examples, depending on which template you are working with. This is the code you would copy from the editor into your HTML file:
<!-- wp:woocommerce/legacy-template {"template":"archive-product"} /-->

<!-- wp:woocommerce/legacy-template {"template":"single-product"} /-->

<!-- wp:woocommerce/legacy-template {"template":"taxonomy-product_tag"} /-->

<!-- wp:woocommerce/legacy-template {"template":"taxonomy-product_cat"} /-->
If you place the block inside a group block with the option “Inherit default layout” enabled, the block also supports wide and full width attributes:
<!-- wp:woocommerce/legacy-template {"template":"archive-product","align":"wide"} /-->Important: This legacy block uses a wrapper with a <main> element. Make sure that your page only contains one <main> element. Read “Use Only One <main> on a Page” by Adrian Roselli.
Styling the classic template
To style details like text colors and buttons in the classic template blocks, you need to use CSS and not theme.json. Elements in this block use the old WooCommerce CSS classes which are not prefixed, such as price, onsale, and add_to_cart_button.
You can add a new separate stylesheet that you load conditionally if WooCommerce is active, (recommended) or add your WooCommerce CSS to your existing stylesheets.
A problem you may run into is that if you use two different types of WooCommerce block templates in your full site editing theme, you also need to target both the classic CSS classes and the new prefixed classes in your CSS.
Using WooCommerce Customizer settings
WooCommerce includes a small set of Customizer options that can only be used with the Classic Template blocks. You can change the product image sizes and adjust the number of columns and rows on the product and category archives.

You do not need to make any changes to the theme to activate the Customizer, it is re-enabled by default. To learn more, please see the lesson How to re-enable the Customizer in block themes.
Using WooCommerce filters and hooks
While editing is not possible through the Site Editor, you can still use WooCommerce filters and hooks with the Classic Template blocks. I recommend the Action and Filter Hook Reference in the WooCommerce Code Reference and the theming snippets (code examples).
Using the WooCommerce product blocks
Blocks for WooCommerce are not a new feature, but with site editing, both developers and site creators can place and preview the blocks anywhere on the site and in the content. You can showcase featured products, use a product in a call to action, display selected reviews and products from specific categories, or add a product search.
As a theme developer or designer, you can create custom styles for the blocks and combine them into block patterns, helping users highlight their most important products.
Compared to the Classic Template blocks, you can preview product blocks in the block editor and Site Editor and combine them to create new page sections.
WooCommerce blocks are built using other WordPress blocks
Some of the blocks use WordPress core blocks as inner blocks, and many settings will feel familiar which makes them easy to use. For example, the featured product block has settings that are similar to the cover block and uses a product image and a button block:

A closer look at the shop page
Both the Products (Beta) block and the newer Product Collection (Beta) blocks are very similar to the query block that you use to display the latest posts: you can think of it as a query block variation. If you have worked with the query block, the settings should already be familiar to you.

The block can inherit the query from the template, and this is the setting you need to use for the product archives that display products by category or tags etc. It has also has advanced sorting and filter options for when you do not want to inherit the query:

Just like the query block uses an inner block called post template, the Products and Product Collection blocks have a product template. The inner blocks inside the product template can for example be the product image, the product title, price, rating, and add to cart button:

These blocks are, in my opinion, a great step forward for WooCommerce and they are much easier to use than the old classic templates which required in-depth knowledge of PHP, WooCommerce filters and hooks.
Cart block
The cart block has two inner blocks, the filled cart and the empty cart, which in turn have other blocks nested inside them: Switching between the two carts requires selecting the inner block in the list view:

The filled cart is locked, and you can not move or remove blocks; this is great because it prevents us from accidentally breaking our carts! If you need to remove blocks, you can edit the cart.html template in your code editor. There are also no style settings for things like text size, colors or spacing. You can add some new inner blocks: images, paragraphs, and separators.
The empty cart comes with prefilled default blocks and is fully editable. The default blocks are two headings, a paragraph linked to the store, and the three latest products.
Mini-Cart block
A Mini-Cart can be used as a quick way for the shop customer to view the cart, for example from the site’s header.
The Mini-Cart is a unique block because it has a custom template part for the cart drawer. You can open the template part from Appearance > Editor > Patterns > Manage all template parts, or from the block settings sidebar:

Like the cart block, the mini cart has a filled and empty cart. The filled cart is locked, and the empty cart is fully editable:

Checkout block
The checkout block is another complex block with several inner blocks. The checkout fields (displayed on the left) and the checkout totals (in the right column) are the two main blocks.
The inner blocks are locked by default. They include contact information, shipping address, shipping options, billing address, and payment options.
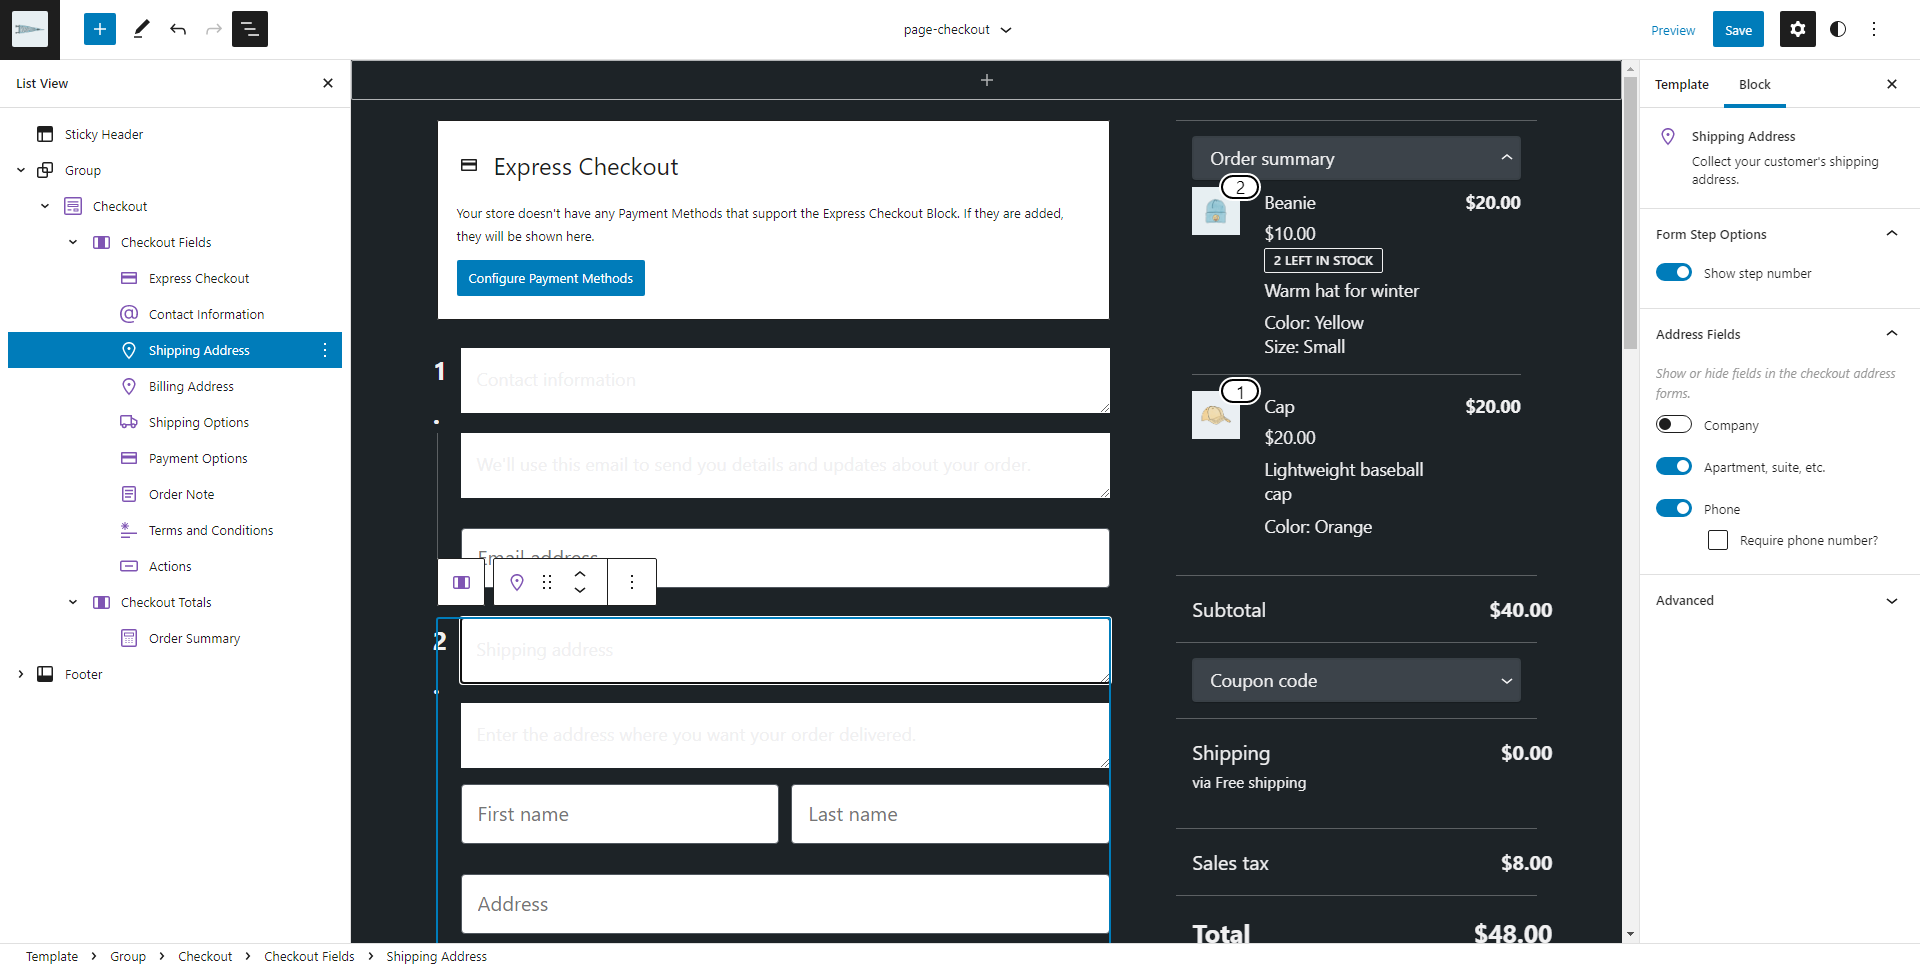
This block feels more developed than the two cart blocks, and there are several helpful block settings. You can switch the position of the checkout fields and the order summary, edit the address fields, show or hide the step number, or let users sign up for an account.
There are also direct links from the block sidebar to the different plugin settings for easier management.
Styling WooCommerce product blocks
Using custom CSS
The product blocks use CSS classes prefixed with wc- or woocommerce-, but they also use WordPress core blocks. For example, most buttons inherits the styles you have added to the button block.
The new components and naming convention for the CSS classes makes it easier to style the shop elements. For example, to style the product image block, you can target the wrapping div which uses the class .wc-block-components-product-image. To find the correct classes to use, view the source code of the respective block.
Using theme.json
If you are not familiar with theme.json, I recommend starting with the beginner lesson.
Let me start by explaining that I have not tried styling all WooCommerce blocks using theme.json, so there may be exceptions that I have not found. Not all styles work, so there is a bit of a trial and error.
To style a WooCommerce block, you need to use the Styles > Blocks section in theme.json, using woocommerce as the prefix, followed by the block slug.
This example changes the border radius of the product image block on the shop page (the archive), but if you want to style all the product images, you will need to locate and style more than one block type:
"styles": {
	"blocks": {
		"woocommerce/product-image": {
			"border": {
				"radius": "8px"
			}
		}
	}
}
If you try this example for the active filters block, you will notice that the text color works, but the spacing between the filters is not applied:
"styles": {
	"blocks": {
		"woocommerce/active-filters": {
			"color": {
				"text": "green"
			},
			"spacing": {
				"blockGap": "1.7rem"
			}
		}
	}
}
Resources
I am not a WooCommerce expert, and initially, I had some trouble finding the documentation that I needed and ran into broken links and whatnot. I want to share these resources with you so that you can continue to learn from them.
WooCommerce developer documentaiton: Theming for Woo blocks
Follow the WooCommerce GitHub repository to keep track of changes and known limitations and bugs. If you are curious, you can find the source of the WooCommerce block templates here.
Follow the WooCommerce developer blog for news and tutorials.