With full site editing, the user has two new ways to create templates:
- Through the Site Editor (Read the Site Editor introduction)
- Through the block editor. -These are templates that the user assigns to a post or page.
In this lesson, I cover how to change the blocks that WordPress adds when the user creates a custom template in the block editor. A template assigned to a post or page.
To learn how to add default blocks to the block editor, please see this lesson.
I have written this lesson using Gutenberg version 15.8.1. If you are using a newer version the interface may look different.
Estimated reading time: 3 minutes
Last updated
Creating templates in the Site Editor vs the Block Editor
When a user creates a new template through the Site Editor, WordPress prompts them asking if the user wants to use a premade template:

This premade template is the single post template of the active theme (or the index, if the post template is missing). This means that both the theme developer and users with the correct permission are able to change the default blocks.
However, when the user wants to create a template for the post or page that they are currently editing inside the block editor, they are not presented with this option.
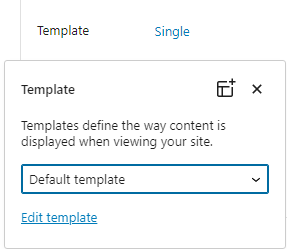
In WordPress 6.1, the template selection was moved to the summary panel in the post sidebar:

When the user selects the button with the template name “Single” in the image above, the editor opens a modal where the user can create a new template by clicking on the plus icon:
Inside this new template, WordPress loads a few basic blocks: groups, site title, tagline, separator block, post title, and post content. It does not include a site footer:

How to replace the default blocks
To change the blocks that WordPress places in the default template, you need to use the block_editor_settings_all filter. The setting that you are updating is called defaultBlockTemplate.
I recommend these two resources for learning more about the filter:
Block editor handbook reference
Creating an empty template
In some cases, you may prefer a blank template since you don’t need to remove any existing blocks when you open the template editor. In this case, just leave the setting empty:
function prefix_default_page_template( $settings ) {
	$settings['defaultBlockTemplate'] = "";
	return $settings;
}
add_filter( 'block_editor_settings_all', 'prefix_default_page_template' );
Using a file as the default template
You can add a template by including an HTML file with your block markup inside.
You could for example use your standard template for posts or pages. In this code example, I created a custom template that I called default and placed it in the templates folder:
function prefix_default_page_template( $settings ) {
	$settings['defaultBlockTemplate'] = file_get_contents( get_theme_file_path( 'templates/default.html' ) );
	return $settings;
}
add_filter( 'block_editor_settings_all', 'prefix_default_page_template' );
Using markup directly in the filter
Another option is to use block markup directly in the filter. This may be preferable if you only want to add a few blocks:
function prefix_default_page_template( $settings ) {
	$settings['defaultBlockTemplate'] = '<!-- wp:template-part {"slug":"header","theme":"theme-slug","tagName":"header"} /-->
<!-- wp:group {"tagName":"main","layout":{"type":"constrained"}} -->
<main class="wp-block-group">
<!-- wp:post-title /-->
<!-- wp:post-content /-->
</main>
<!-- /wp:group -->
<!-- wp:template-part {"slug":"footer","theme":"theme-slug","tagName":"footer"} /-->';
	return $settings;
}
add_filter( 'block_editor_settings_all', 'prefix_default_page_template' );