With the Block Bindings API, you can use existing blocks to display custom and dynamic data. Block bindings can, in some cases, save you from having to create custom blocks. They can also replace short codes, displaying the same value, but with all the style options of a block. Behind the scenes, the Block Bindings API is part of what enables synced pattern overrides.
The purpose of this lesson is not to sell you on block bindings, but to help you learn enough to decide if block bindings are a viable option for you.
This lesson requires WordPress 6.9 or newer.
In short, the Block Bindings API works by registering a source and referencing that source in a block attribute.
The attribute can be, for example, a link or a visible text, depending on the block.
A block binding does not store the value itself; it stores a reference to the source. When you update the source, all blocks that use it are updated automatically.
WordPress enables a few sources by default:
- Post data: the title, published and modified date, and the permalink.
- Post meta (custom fields), which you either register yourself or create with a plugin like Meta Box or Advanced Custom Fields.
- Term data, which is supported by the term query block.
- Pattern overrides, which are used by synced patterns.
You can also register custom sources with PHP and JavaScript. This makes the feature very flexible; for example, you can use it to show a co-author of a blog post or display the most recently sold WooCommerce product. You can use any data; it is really up to your imagination. In this lesson, I will only show how to use post meta and custom sources.
Block bindings work with both classic themes and block themes. They are synced across your site and use the same purple accent color as synced patterns
Which blocks support the block bindings API?
The following core blocks support block bindings using a set of default attributes:
| Block | Attributes |
|---|---|
| Heading | content |
| Paragraph | content |
| Button | url, text, linkTarget, rel |
| Image | id, url, title, alt, caption |
| Navigation block: Link | url |
| Navigation block: Submenu | url |
| Post date | datetime |
How to use post meta as a block binding source
This basic example registers a new custom field for a post that accepts a single string and displays it in a paragraph block.
First, go to your WordPress test installation and create a new post (Make sure you have WordPress version 6.9 or newer, depending on when you read this). Enable the custom fields UI in the block editor from Options > Preferences:

How to register and connect the post meta
Open your plugin or theme files in your code editor. It is not enough to add new fields and values in the Custom Fields UI: you do need to register the post meta.
If you are using a block theme and don’t already have a functions.php file, create one now.
To register the post meta, you can use register_post_meta() with these two parameters and an array of arguments:
- object _type: This example uses posts, so this will be ‘post’.
- meta_key: A unique identifier and the
namefor the key in the custom fields UI. Remember to use a unique prefix, for example, the theme slug.
<?php
register_post_meta(
    'post', // The post type.
    'themeslug_example_text', // Your meta key.
    array(
        'show_in_rest'      => true, // Required.
        'single'            => true, // Required.
        'type'              => 'string',
        'sanitize_callback' => 'wp_strip_all_tags' // The name of the sanitization function.
    )
);
Do not forget to sanitize the input that the user is entering into the meta field; you can not trust that user input is safe. In this example, the expected format is plain text.
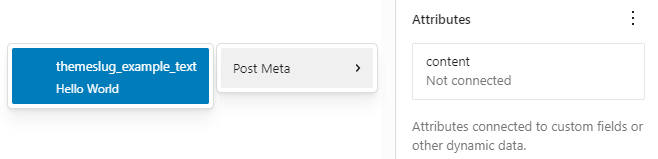
In the custom fields UI for your post, click on the button that says “Enter new”, and set the name to themeslug_example_text and the value to “Hello World”. Then click the “Add Custom Field” button.

Nothing will show until you bind this data to a block.
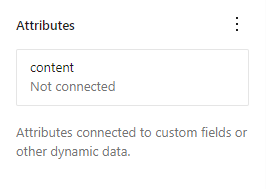
Insert a paragraph block. Open the block settings sidebar and expand the Attributes panel.
💡You need to be logged in as a user with the correct capability to connect the binding in the Attributes panel, such as an administrator, super admin, or editor.
Select the content attribute.
To add the connection, click on content again to open the list of available bindings. Hover over Post Meta and select the key and value pair you just registered:
When you apply it, the block will display the value and use a purple border:

Let’s look at how the block uses the value. Switch to the code editor mode in the block editor and locate the paragraph block:
<!-- wp:paragraph {"metadata":{"bindings":{"content":{"source":"core/post-meta","args":{"key":"themeslug_example_text"}}}}} -->
<p></p>
<!-- /wp:paragraph -->
The JSON in the block comment first includes a metadata called bindings:
<!-- wp:paragraph {
	"metadata":{
		"bindings":{
			...
		}
	}
} -->
<p></p>
<!-- /wp:paragraph -->
Inside bindings, you have the attribute, content:
<!-- wp:paragraph {
	"metadata":{
		"bindings":{
			"content":{
				...
				}
			}
		}
	}
} -->
<p></p>
<!-- /wp:paragraph -->
And inside content, you find the source, which is core/post-meta, and the arguments. In this example, there is only one argument, the name of the meta key.
<!-- wp:paragraph {
	"metadata":{
		"bindings":{
			"content":{
				"source":"core/post-meta",
				"args":{"key":"themeslug_example_text"}
			}
		}
	}
} -->
<p></p>
<!-- /wp:paragraph -->
Save the post. Disable the Custom Fields interface again. Do not just close it.
Duplicate the paragraph block.
Now try typing in a new text in one of the bound paragraphs. See how both paragraphs are updated. This is because you just updated the value of the custom field.
💡This kind of direct editing works with post meta and post data, not with custom sources.
The importance of type
The binding you used in the example is not limited to the content attribute of the paragraph block. Bindings are not limited to blocks nor attributes, but to the type. When you registered the post meta, you set the type to string.
This means that the binding can be used with any supported block attribute that uses the type string:
- The content attribute of the heading and paragraph block.
- All attributes of the button block.
- All attributes of the image block except the id, which requires a number.
This is useful if you ever want the same text string to be used as a paragraph or a button text, but not so handy if you want to limit the usage.
So how did I know which block attributes use which type?
By checking the block.json source of the supported blocks.
How do you limit which block attributes can use block bindings?
WordPress 6.9 introduced a new PHP filter, block_bindings_supported_attributes_{$block_type}, where $block_type is the prefix and the name of the block.
For example, if you wanted to disable block bindings for the WordPress core heading block, one option would be to use the filter and remove all supported attributes by returning an empty array.
The filter is block_bindings_supported_attributes_core/heading
where core is the prefix and heading is the block name (slug).
add_filter(
	'block_bindings_supported_attributes_core/heading',
	function( $supported_attributes ) {
		return array();
	}
);
If you wanted to disable bindings on the title attribute on the WordPress core image block, your code may look like this:
add_filter(
	'block_bindings_supported_attributes_core/image',
	function( $supported_attributes ) {
		return array_values(
			array_diff( $supported_attributes, array( 'title' ) )
		);
	}
);
How to use custom block binding sources
Registering custom block binding sources consists of two parts:
- The server-side registration, using PHP.
- The client-side registration, which handles previewing and selecting the block bindings in the block editor, uses JavaScript.
For this part of the lesson, I have chosen to register multiple binding sources. This is because I believe this approach is the most beginner-friendly. It does not invalidate other methods.
Step 1: Registering a block binding source using PHP
When registering a custom source, you must use the function register_block_bindings_source() attached to an init hook.
The required parameters are:
- source_name: A unique identifier with a prefix followed by a slug, eg
themeslug/custom-source-example. - source_properties: An array of properties:
- label: A label that describes the source. Required.
- get_value_callback: A reference to your callback, for example, a function that will be run when the bound block is parsed. Required.
- uses_context: An array of block contexts that extends the WP_Block class so that the contexts can be passed to the callback. Optional.
A block context is a concept used in block development, so don’t worry if this feels unfamiliar. Basically, it lets blocks pass data to an inner block. A block can both provide and use a context. Like a query block passing the query to the post template, which passes the post id to the post title block.
Read about block contexts in the block editor handbook.
<?php
function themeslug_register_block_bindings() {
	register_block_bindings_source(
		'themeslug/custom-source-example',
		array(
			'label' => __( 'Example', 'themeslug' ),
			'get_value_callback' => 'themeslug_bindings_callback',
			'uses_context' => ['postId']
		)
	);
}

add_action( 'init', 'themeslug_register_block_bindings' );
Understanding the optional parameters of the callback
The callback can accept three optional parameters from register_block_bindings_source().
- $source_args: An array of arguments passed via the
metadata.bindings.$attribute.argsproperty from the block. - $block_instance: The current instance of the block the binding is connected to as a
WP_Blockobject. - $attribute_name: The current attribute set via the
metadata.bindings.$attributeproperty key on the block.
function themeslug_bindings_callback( $source_args, $block_instance, $attribute_name ) {
	...
}
Confused? So was I, so as part of the learning process, I wanted to try to describe them in my own words:
block_instance: An instance of the WP_Block class, an Object, which is the parsed block, including the block name, context, inner content, inner blocks, and more. See WP_Block in the code reference.
attribute_name: The easiest way for me to think about this value is that it is the name of the block property that uses the source.
For example, the content of the paragraph.
source_args: So if the attribute_name is the property that uses the source, then the source args is the array with key and value pairs that are inside content.args, right? In the example with the post meta, that would be the key and the name of the post meta key:
<!-- wp:paragraph {"metadata":{"bindings":{"content":{"source":"core/post-meta","args":{"key":"themeslug_example_text"}}}}} -->If you are only using one binding, you won’t need these parameters. You only need to return a single value. If you are binding a single value to a block that has more than one attribute, WordPress will use it with the first attribute.
Image block example
First, register the binding with the custom callback in your theme or plugin file:
<?php
function themeslug_register_block_bindings() {
	register_block_bindings_source(
		'themeslug/image-example',
		array(
			'label' => __( 'Image Example', 'themeslug' ),
			'get_value_callback' => 'themeslug_image_bindings_callback'
		)
	);
}

add_action( 'init', 'themeslug_register_block_bindings' );
Create the callback function. The example below returns the URL to an adorable photo of Buffy, but only if:
- The block is the core image block.
- The block attribute is the
url. - The custom source argument includes a
keywith the valueimage_url.
function themeslug_image_bindings_callback( array $source_args, $block_instance, string $attribute_name ) {
	$block_name = '';

	if ( is_object( $block_instance ) && isset( $block_instance->name ) ) {
		$block_name = (string) $block_instance->name;
	}

	if ( 'core/image' !== $block_name ) {
		return null;
	}

	if (
		'url' === $attribute_name
		&& isset( $source_args['key'] )
		&& 'image_url' === $source_args['key']
	) {
		return 'https://pd.w.org/2023/04/893642d3da2481166.65757956.jpg';
	}

	return null;
}
I want to explain why I’m validating both the attribute name and the key. The reason is to prevent user error. If the user accidentally assigns the URL to the caption, the title, or alternative text, it will not be visible on the front.
Add the image block markup with the binding to your post in the code editor mode:
<!-- wp:image {
	"metadata": {
		"bindings": {
			"url": {
				"source": "themeslug/image-example",
				"args": {"key": "image_url"}
			}
		}
	}
} -->
<figure class="wp-block-image"><img alt="" /></figure>
<!-- /wp:image -->
The src attribute of the image is intentionally omitted.
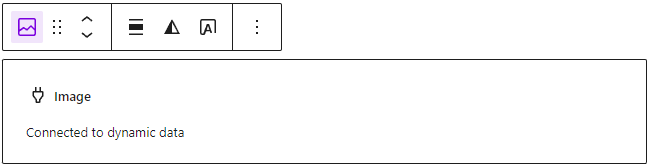
The image block will show a placeholder in the editor, but if you save and view the post, the image should show correctly on the front.
Now, let’s credit Buffy’s owner, Carole, for the photo she shared in the WordPress photo directory.
To add the credit to the caption, the callback must now return two values. Add a condition that checks for the correct $attribute_name and the custom key with the value image_caption:
function themeslug_image_bindings_callback( array $source_args, $block_instance, string $attribute_name ) {
	$block_name = '';

	if ( is_object( $block_instance ) && isset( $block_instance->name ) ) {
		$block_name = (string) $block_instance->name;
	}

	if ( 'core/image' !== $block_name ) {
		return null;
	}

	if (
		'url' === $attribute_name
		&& isset( $source_args['key'] )
		&& 'image_url' === $source_args['key']
	) {
		return 'https://pd.w.org/2023/04/893642d3da2481166.65757956.jpg';
	}

	if (
		'caption' === $attribute_name
		&& isset( $source_args['key'] )
		&& 'image_caption' === $source_args['key']
	) {
		return __( 'Photo by: Carole', 'themeslug' );
	}

	return null;
}
Update the image block to include the caption. Both the url and caption should be inside bindings:
<!-- wp:image {
	"metadata": {
		"bindings": {
			"url": {
				"source": "themeslug/image-example",
				"args": {
					"key": "image_url"
				}
			},
			"caption": {
				"source": "themeslug/image-example",
				"args": {
					"key": "image_caption"
				}
			}
		}
	}
} -->
<figure class="wp-block-image"><img alt="" /><figcaption class="wp-element-caption"></figcaption></figure>
<!-- /wp:image -->
You might notice that once the caption is connected to a block binding, the interface where you edit the caption is removed from the block toolbar. This is intentional.
View the block on the front to confirm that the caption is showing correctly.
Use the same method to add an alternative text:
function themeslug_image_bindings_callback( array $source_args, $block_instance, string $attribute_name ) {
	$block_name = '';

	if ( is_object( $block_instance ) && isset( $block_instance->name ) ) {
		$block_name = (string) $block_instance->name;
	}

	if ( 'core/image' !== $block_name ) {
		return null;
	}

	if (
		'url' === $attribute_name
		&& isset( $source_args['key'] )
		&& 'image_url' === $source_args['key']
	) {
		return 'https://pd.w.org/2023/04/893642d3da2481166.65757956.jpg';
	}

	if (
		'caption' === $attribute_name
		&& isset( $source_args['key'] )
		&& 'image_caption' === $source_args['key']
	) {
		return __( 'Photo by: Carole', 'themeslug' );
	}

	if (
		'alt' === $attribute_name
		&& isset( $source_args['key'] )
		&& 'alt' === $source_args['key']
	) {
		return __( 'A small black and brown dog is swimming in a pool with clear turquoise water.', 'themeslug' );
	}

	return null;
}
(Of course, you don’t need to check if $source_args[‘key’] is set 3 times; I was feeling lazy, you go ahead and tidy your code up before using it in production. 😛 )
Add the alt attribute inside bindings, but leave it empty in the HTML:
<!-- wp:image {
	"metadata": {
		"bindings": {
			"url": {
				"source": "themeslug/image-example",
				"args": {
					"key": "image_url"
				}
			},
			"caption": {
				"source": "themeslug/image-example",
				"args": {
					"key": "image_caption"
				}
			},
			"alt":{
				"source":"themeslug/image-example",
				"args": {
					"key": "alt"
				}
			}
		}
	}
} -->
<figure class="wp-block-image"><img alt="" /><figcaption class="wp-element-caption"></figcaption></figure>
<!-- /wp:image -->
Button block example
Let’s add a button block directing visitors to the WordPress photo directory. Register the second source:
function themeslug_register_block_bindings() {
	register_block_bindings_source(
		'themeslug/image-example',
		array(
			'label' => __( 'Image Example', 'themeslug' ),
			'get_value_callback' => 'themeslug_image_bindings_callback'
		)
	);
	register_block_bindings_source(
		'themeslug/button-example',
		array(
			'label' => __( 'Button Example', 'themeslug' ),
			'get_value_callback' => 'themeslug_button_bindings_callback'
		)
	);
}
Create the callback function. As a reminder, the button block uses url, text, linkTarget, and rel.
function themeslug_button_bindings_callback( array $source_args, $block_instance, string $attribute_name ) {

	$block_name = '';

	if ( is_object( $block_instance ) && isset( $block_instance->name ) ) {
		$block_name = (string) $block_instance->name;
	}

	if ( 'core/button' !== $block_name ) {
		return null;
	}

	if (
		'url' === $attribute_name
		&& isset( $source_args['key'] )
		&& 'button_url' === $source_args['key']
	) {
		return 'https://wordpress.org/photos/?s=dogs';
	}

	if (
		'text' === $attribute_name
		&& isset( $source_args['key'] )
		&& 'button_text' === $source_args['key']
	) {
		return __( 'See more photos', 'themeslug' );
	}
	return null;
}
Copy and paste the button block into the code editor:
<!-- wp:buttons -->
<div class="wp-block-buttons">
	<!-- wp:button {
		"metadata": {
			"bindings": {
				"url": {
					"source": "themeslug/button-example",
					"args": {
						"key": "button_url"
					}
				},
				"text": {
					"source": "themeslug/button-example",
					"args": {
						"key": "button_text"
					}
				}
			}
		}
	} -->
	<div class="wp-block-button">
		<a class="wp-block-button__link wp-element-button"></a>
	</div>
	<!-- /wp:button -->
</div>
<!-- /wp:buttons -->
Result on the front:

Step 2: Registering the custom block binding source using JavaScript
OK, that is enough repetition. Now, let’s add the bindings to the editor.
Create a new JavaScript file called block-bindings.js.
The code example assumes that your JavaScript files are placed in the folder assets/js. Update this as needed.
You do not need a build process to register the binding.
The function you need to use is called registerBlockBindingsSource() and is part of the WordPress blocks package.
The required arguments for registerBlockBindingsSource are:
name, which is the unique identifier.label, the visible label in the interface.
The name must match the name that you used in the server-side registration, themeslug/image-example and themeslug/button-example.
In the example, wp.i18n is used to make the label translatable.
( function ( wp ) {
	const { __ } = wp.i18n;
	const { registerBlockBindingsSource } = wp.blocks;

	registerBlockBindingsSource( {
		name: 'themeslug/image-example',
		label: __( 'Editor Image Example', 'themeslug' ),
	} );

	registerBlockBindingsSource( {
		name: 'themeslug/button-example',
		label: __( 'Editor Button Example', 'themeslug' ),
	} );

} )( window.wp );
Now, let’s enqueue the new file. Using enqueue_block_editor_assets ensures that the JavaScript only loads in the editor, not on the front.
add_action(
	'enqueue_block_editor_assets',
	function() {
		wp_enqueue_script(
			'themeslug-block-bindings-editor',
			get_theme_file_uri( 'assets/js/block-bindings.js' ),
			array( 'wp-blocks', 'wp-i18n' ),
			wp_get_theme()->get( 'Version' ),
			true
		);
	}
);
If you were adding the code to a plugin, you would use plugins_url() instead of get_theme_file_uri().
If you go back to the block editor and reload your post, you should see that the block bindings in the Attributes panel have a new label. The label in the JavaScript file overrides the label set during the PHP registration.
How do you display the binding value inside the editor?
So far, the editor has only shown placeholders. To display the value of the bindings in the editor, you need to use a JavaScript function called getValues(). This function only affects the editor; it does not affect how the block is rendered on the front end.
The first code example shows how to add the image source to the image block.
First, add getValues() inside registerBlockBindingSource and pass the registered bindings object as a parameter: getValues: ( { bindings } )
(For other accepted parameters, please read the documentation.)
Then add a condition that checks if the bindings url attribute contains the source argument (args) with the correct key and value pair:if ( bindings.url?.args?.key === 'image_url' )
Without this check, there will be JavaScript errors.
Finally, the function must return an object with the block attribute and the value.
( function ( wp ) {
    const { __ } = wp.i18n;
    const { registerBlockBindingsSource } = wp.blocks;

    registerBlockBindingsSource( {
        name: 'themeslug/image-example',
        label: __( 'Editor Image Example', 'themeslug' ),
        getValues: ( { bindings } ) => {
            const values = {};

            if ( bindings.url?.args?.key === 'image_url' ) {
                values.url = 'https://pd.w.org/2023/04/893642d3da2481166.65757956.jpg';
            }

            return values;
        },
    } );
} )( window.wp );
You should now see the image of the dog in the block editor.
Add the conditions and the returns for the alt text and caption the same way:
( function ( wp ) {
    const { __ } = wp.i18n;
    const { registerBlockBindingsSource } = wp.blocks;

    registerBlockBindingsSource( {
        name: 'themeslug/image-example',
        label: __( 'Editor Image Example', 'themeslug' ),
        getValues: ( { bindings } ) => {
            const values = {};

            if ( bindings.url?.args?.key === 'image_url' ) {
                values.url = 'https://pd.w.org/2023/04/893642d3da2481166.65757956.jpg';
            }

            if ( bindings.alt?.args?.key === 'alt' ) {
                values.alt = __(
                    'A small black and brown dog is swimming in a pool with clear turquoise water.',
                    'themeslug'
                );
            }

            if ( bindings.caption?.args?.key === 'image_caption' ) {
                values.caption = __( 'Photo by: Carole', 'themeslug' );
            }

            return values;
        },
    } );
} )( window.wp );
You may be thinking, if I need to duplicate the values in both PHP and JavaScript, it is duplicate work and not super useful, and you would be right. This is only a basic example.
If you want the values that you have registered in PHP to be available in JavaScript, you can register a custom REST API endpoint.
How do you assign a custom block binding using the editor interface?
Please bear with me on this one. In some client projects, you do not want the content editor to select bindings themselves, because it can lead to mistakes.
Still, I hope you do not skip this part, because it shows some limitations in the block bindings that can be time-consuming to discover through testing alone.
As shown earlier, post meta values are available in the Attributes panel by default. However, to make your custom binding sources selectable in the Attributes panel, you need to use a new function called getFieldsList(). This was added in WordPress 6.9, and I strongly recommend reading the documentation.
The function should return an array of bindings. Each binding is listed with:
label, the visible label in the editor. Optional.type, the type of the value, for example, string, number, etc.args, an object of source arguments.
In this example, args contains the custom key and value pair for the image block url:
getFieldsList() {
	return [
		{
			label: __( 'Image URL', 'themeslug' ),
			type: 'string',
			args: { key: 'image_url' }
		}
	];
}
Here is the code example for the image and button blocks:
I have truncated getValues() for readability; you will need to adjust the code accordingly.
( function ( wp ) {
	const { __ } = wp.i18n;
	const { registerBlockBindingsSource } = wp.blocks;

	registerBlockBindingsSource( {
		name: 'themeslug/image-example',
		label: __( 'Editor Image Example', 'themeslug' ),
		getValues: ( { bindings } ) => {...},
		getFieldsList() {
			return [
				{
					label: __( 'Image URL', 'themeslug' ),
					type: 'string',
					args: { key: 'image_url' }
				},
				{
					label: __( 'Caption', 'themeslug' ),
					type: 'string',
					args: { key: 'image_caption' }
				},
				{
					label: __( 'Alt', 'themeslug' ),
					type: 'string',
					args: { key: 'alt' }
				},
			];
		},
	} );

	registerBlockBindingsSource( {
		name: 'themeslug/button-example',
		label: __( 'Editor Button Example', 'themeslug' ),
		getValues: ( { bindings } ) => {...},
		getFieldsList() {
			return [
				{
					label: __( 'Button URL', 'themeslug' ),
					type: 'string',
					args: { key: 'button_url' }
				},
				{
					label: __( 'Text', 'themeslug' ),
					type: 'string',
					args: { key: 'button_text' }
				},
			];
		}
	} );

} )( window.wp );
So why go through all the trouble of using custom key and value pairs? Because getFieldsList() does not have an option to limit a source to a specific block or attribute.
Instead, it matches the type: all block attributes that use the string type can use all bindings that use the string type.
In other words, the image URL can be applied to the alternative text. This increases the risk that a binding will be used in an unexpected way.
That is why you are limiting what is printed on the front using the PHP callback.
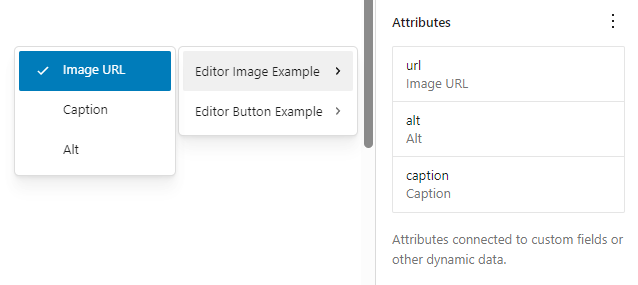
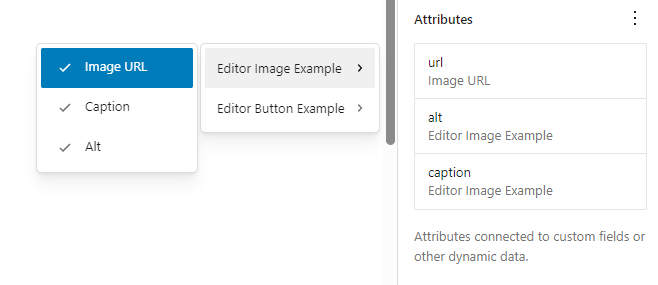
With the key and value pair, the block editor interface correctly shows which value is currently connected:
While if getFieldsList() had returned an empty args object, the interface would be much more confusing, because it would show multiple selected items:
Hopefully, this will be simplified in the future.
Preferred workflow: pre-configured bindings using a block variation
The preferred workflow is often to let content editors insert a block with the block binding already configured.
This can be solved with a block variation. I have a separate lesson on block variations if you need a recap.
You can create block variations for individual blocks. In this example, however, I want to bundle the image and button together inside a group.
Create a new JavaScript file called block-variations.js and enqueue it:
add_action(
	'enqueue_block_editor_assets',
	function() {
		wp_enqueue_script(
			'themeslug-block-bindings-editor',
			get_theme_file_uri( 'assets/js/block-bindings.js' ),
			array( 'wp-blocks', 'wp-i18n' ),
			wp_get_theme()->get( 'Version' ),
			true
		);
		wp_enqueue_script(
			'themeslug-block-variations',
			get_theme_file_uri( 'assets/js/block-variations.js' ),
			array( 'wp-blocks', 'wp-i18n' ),
			wp_get_theme()->get( 'Version' ),
			true
		);
	}
);
Then, in the JavaScript file, use registerBlockVariation to register an empty group.
The title and description are optional. If you look inside the attributes, I have added a metadata attribute with a name. This will be the visible label for the variation in the List View. It’s just a small quality-of-life improvement.
( function ( wp ) {
	const { __ } = wp.i18n;
	const { registerBlockVariation } = wp.blocks;

	wp.domReady( function () {
		registerBlockVariation( 'core/group', {
			name: 'themeslug/bindings-demo-group',
			title: __( 'Bindings demo (Group)', 'themeslug' ),
			description: __( 'Group with a bound image and button.', 'themeslug' ),
			scope: [ 'inserter' ],
			attributes: {
				layout: { type: 'constrained' },
				metadata: { name: 'Bindings demo (Group)' },
			}
		} );
	} );
} )( window.wp );
Below the attributes, add the array of inner blocks, starting with the image:
( function ( wp ) {
	const { __ } = wp.i18n;
	const { registerBlockVariation } = wp.blocks;

	wp.domReady( function () {
		registerBlockVariation( 'core/group', {
			name: 'themeslug/bindings-demo-group',
			title: __( 'Bindings demo (Group)', 'themeslug' ),
			description: __( 'Group with a bound image and button.', 'themeslug' ),
			scope: [ 'inserter' ],
			attributes: {
				layout: { type: 'constrained' },
				metadata: { name: 'Bindings demo (Group)' },
			},
			innerBlocks: [
				[
					'core/image'
				],
			],
		} );
	} );
} )( window.wp );
Now you need to add the metadata with the bindings to the image block, using the same format that you used in the block markup earlier, only fewer quotes:
metadata: {
	bindings: {
		url: {
			source: 'themeslug/image-example',
			args: { key: 'image_url' },
		},
		alt: {
			source: 'themeslug/image-example',
			args: { key: 'alt' },
		},
		caption: {
			source: 'themeslug/image-example',
			args: { key: 'image_caption' },
		},
	},
},( function ( wp ) {
const { __ } = wp.i18n;
const { registerBlockVariation } = wp.blocks;
wp.domReady( function () {
registerBlockVariation( 'core/group', {
name: 'themeslug/bindings-demo-group',
title: __( 'Bindings demo (Group)', 'themeslug' ),
description: __( 'Group with a bound image and button.', 'themeslug' ),
scope: [ 'inserter' ],
attributes: {
layout: { type: 'constrained' },
metadata: { name: 'Bindings demo (Group)' },
},
innerBlocks: [
[
'core/image',
{
metadata: {
bindings: {
url: {
source: 'themeslug/image-example',
args: { key: 'image_url' },
},
alt: {
source: 'themeslug/image-example',
args: { key: 'alt' },
},
caption: {
source: 'themeslug/image-example',
args: { key: 'image_caption' },
},
},
},
},
],
],
} );
} );
} )( window.wp );The button block is slightly different, since it’s an inner block of the buttons block, and you need to add both:
( function ( wp ) {
	const { __ } = wp.i18n;
	const { registerBlockVariation } = wp.blocks;

	wp.domReady( function () {
		registerBlockVariation( 'core/group', {
			name: 'themeslug/bindings-demo-group',
			title: __( 'Bindings demo (Group)', 'themeslug' ),
			description: __( 'Group with a bound image and button.', 'themeslug' ),
			scope: [ 'inserter' ],
			attributes: {
				layout: { type: 'constrained' },
				metadata: { name: 'Bindings demo (Group)' },
			},
			innerBlocks: [
			[
			'core/image',
			{
			metadata: {
				bindings: {
				url: {
					source: 'themeslug/image-example',
					args: { key: 'image_url' },
				},
				alt: {
					source: 'themeslug/image-example',
					args: { key: 'alt' },
				},
				caption: {
					source: 'themeslug/image-example',
					args: { key: 'image_caption' },
				},
				},
				},
			},
			],
			[
			'core/buttons',
			{},
			[
			[
			'core/button',
			{
			metadata: {
				bindings: {
				url: {
					source: 'themeslug/button-example',
					args: { key: 'button_url' },
				},
				text: {
					source: 'themeslug/button-example',
					args: { key: 'button_text' },
				},
				},
				},
				text: __( 'Custom Source', 'themeslug' ),
			},
			],
			],
			],
			],
		} );
	} );
} )( window.wp );
Try it out; reload your post in the block editor and insert the new group with the bound blocks.
How to limit who can add bindings in the Attributes panel
WordPress has introduced a capability called edit_block_binding, which grants the ability add (connect) a binding to a block. The capability is enabled on the user roles Administrator, Super Admin, and Editor.
Other users can see and reset the bindings, but they can not add bindings.
This is kind of a two-edged sword, because if users can remove bindings but not add them, then the average user can only restore it with an undo or by deleting and then re-inserting a block that has the binding.
Here is a basic example of how to disable it for the editor role, using PHP:
add_action( 'init', function() {
	$role = get_role( 'editor' );

	if ( $role ) {
		$role->remove_cap( 'edit_block_binding' );
	}
} );
If you want to enable it for all users, there is a new editor setting called canUpdateBlockBindings. This is described in the list of changes for WordPress 6.7.
Resources
Note, most of these are out of date as of WordPress 6.9:
New Feature: The Block Bindings API
Block Bindings: Improvements to the Editor Experience in 6.7
Introducing Block Bindings, part 1: connecting custom fields
Introducing Block Bindings, part 2: Working with custom binding sources
Getting and setting Block Binding values in the Editor
Building a book review site with Block Bindings, part 1: Custom fields and block variations
Building a book review site with Block Bindings, part 2: Queries, patterns, and templates
Snippet: How to filter the output of a block binding
10up developer documentation: Block Bindings API
Block binding examples in the Block Developer Cookbook